
How to: Affordable Water Bottle / Cage Setup for Full Suspension Bikes
- Dec 26, 2018
- 3 min read

My local go to loop is in Fullerton, CA. It's just over 11 miles with about 1100ft of climbing and I can get in a full loop in about an hour. By locals, it's just called "Fullerton Loop," or "Floop" for short. Best of all, it's in my backyard so there's no need to drive anywhere. This also means that a hydration pack feels like overkill, and that a water bottle would be enough to do a quick lap and still keep hydrated. The thing is there's about a thousand different bottle options and a an equal number of cages and a very finite amount of space for a water bottle on my Hightower LT (size Medium).
The following write up details one solution to this problem with a bottle / cage combo that fits and is super inexpensive.
On my road bike, I use big insulated 24oz CamelBak bottles, which work well since there's practically unlimited space in the front triangle of a road bike. On the new mountain bike, however, there's far less space with the rear shock / mount cutting right through the middle.
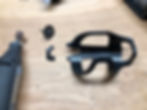
The first thing to do was to ditch the insulated bottles. They add a ton of extra material and just won't work well in tight spaces. Also, knowing the bottle would be a tight fit, I had to go with a side-load bottle cage since a traditional top-load cage wouldn't allow the bottle to be removed with the shock in the way. So I opted for a CamelBak 21oz Podium bottle and a Lezyne Flow SL (side load) cage. These can both be had for less than $10 each!

For anyone curious the 21oz water bottle measures about 8.25" long and my bike is a 2018 Santa Cruz Hightower LT size Medium.

The only problem with this combo is that the Lezyne cage has a protruding tab that is designed for traditional water bottles with a small notch for added security. The small 21oz CamelBak doesn't have that notch, however.

I had read that this was an issue on a forum somewhere, but sure enough, it's true. So the only thing to do was to break out the Dremel and modify the cage slightly. (I got some help from the little guy. Safety first!)


Smoothing out the edges and doing a test fit shows that everything should work.

One concern is that the cage wouldn't hold the bottle very well without that little tab, but I can assure you that the main part of the cage is more than adequate for holding the bottle. It doesn't budge even down super chunky downhill sections. I've read some people even heating the cage slightly and bending it out to relief some of the tension on the bottle. I haven't needed to do it yet, but might consider it later.
Once on the bike, this bottle / cage combo is super tight, but fits with just enough space on either side.


I've been riding with this setup for about 50 miles and haven't had any issues with losing bottles or it coming loose. The 21oz is plenty of hydration for a 1 hour, 11.1 mile loop and best of all no backpack!
For those concerned with carrying tools and a spare, as of now, I've been risking it and carrying nothing on this loop. But in the future, I plan to figure out a spare tube mounting solution as well as do a review on this awesome Italian designed, all-in-one multitool that hides within your crank spindle.
Happy riding!


